Tutoriali - razno |
Odgovori 
|
| Korisnik | |
monna-1 
Trajnica 

Pridružen: 18 Travanj 2008 Lokacija: Croatia Status: Offline Bodovi: 2598 |
 Opcije poruke Opcije poruke
") Hvala(0) Hvala(0)
 Citiranje Odgovor Citiranje Odgovor
 Tema: Tutoriali - razno Tema: Tutoriali - raznoObjavljeno: 18 Prosinac 2009 u 14:19 |
|
Tema za sve ideje i tutoriale u ručnim radovima i inim izradama predmeta, u slikovnim prikazima.
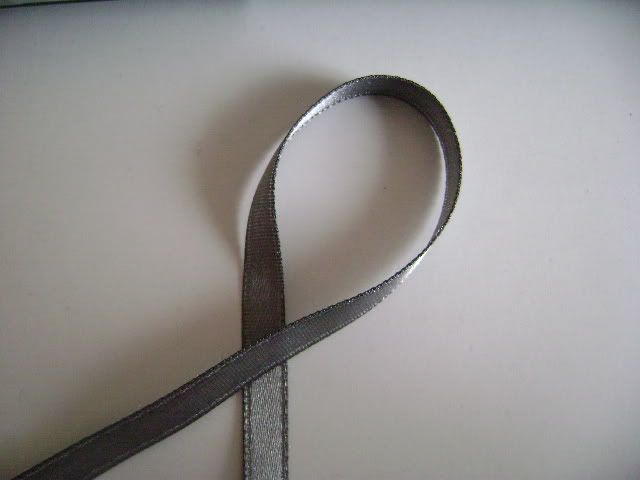
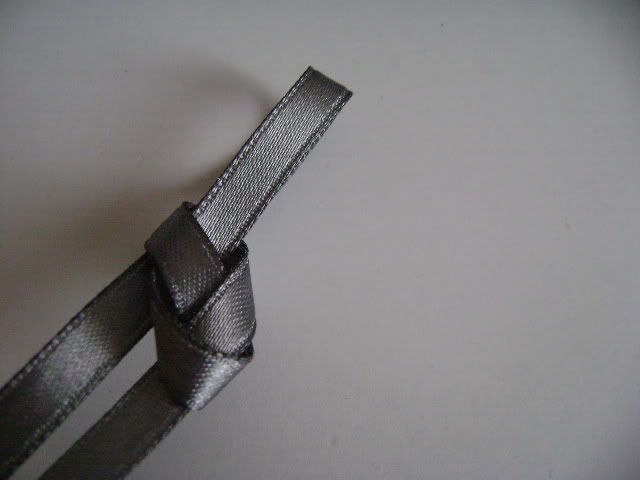
Pletenje trakice od satenske vrpce
- potrebno: satenska trakica (razne širine; ovdje je prikazano pletenje od trakice širine 6 mm), dužine barem 1 metar (ovisi koliko želite finalni proizvod i za što vam je potreban), razni ukrasni kamečići, štras, cvjetići...
1. Traku izravnajte na dvije jednake polovice i napravite "uho" kao na slici
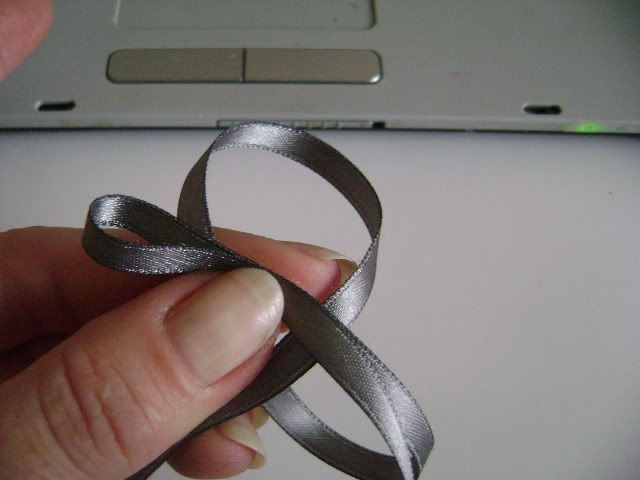
 2. Prvo uho držite prstima, pa sa desne strane napravite još jedno, omotajte preko prvog uha i provucite kroz njega.
 3. Pridržavajte traku i poravnajte rubove, ali ne stežite previše da se ne napravi čvor.
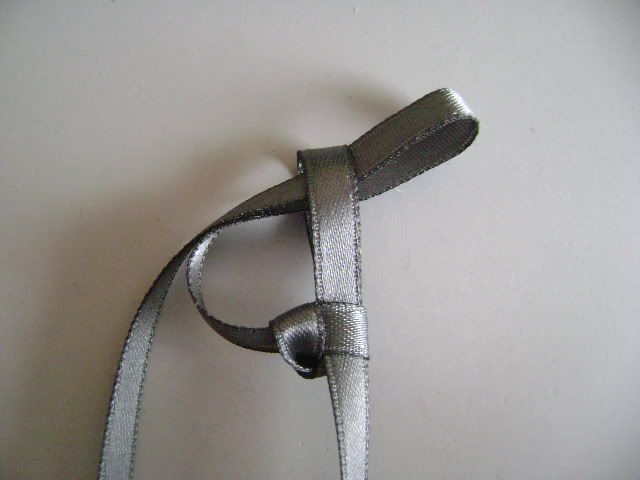 4. Evo ovako:
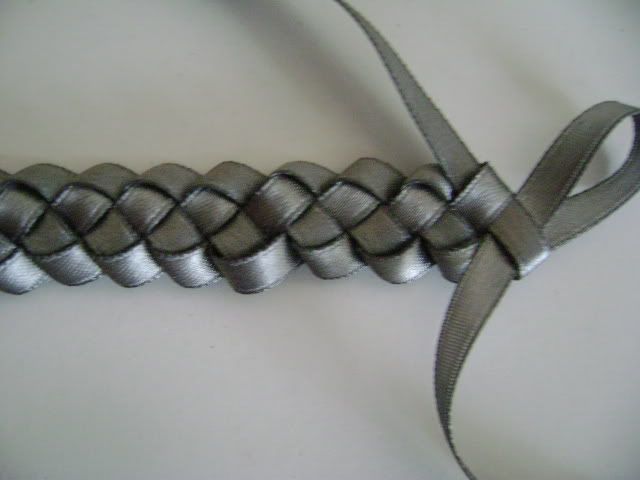
5. Ponovo s desne strane napravite uho i provucite kroz prethodno, poravnajte...
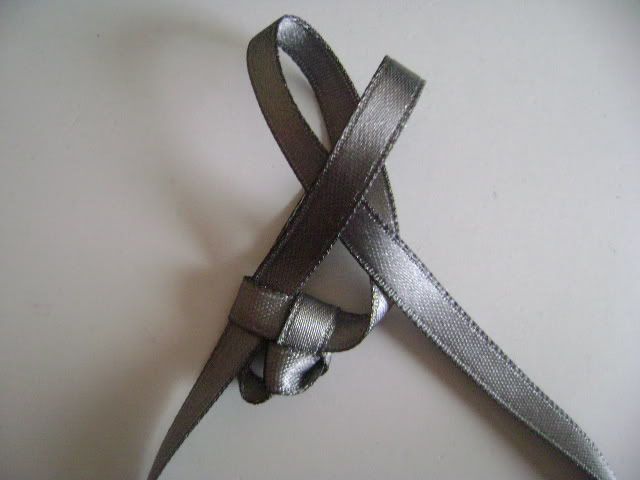  6. Sada s lijeve strane napravite uho i provucite korz prethodno, poravnajte...pa opet s desne...pa s lijeve...itd. dok ne ispletete željenu dužinu. Ako se spetljate, razvežite trakicu i probajte ponovo, malo vježbe i sigurno uspjeva.
7. Na kraju dobijete ovako pletenu trakicu:
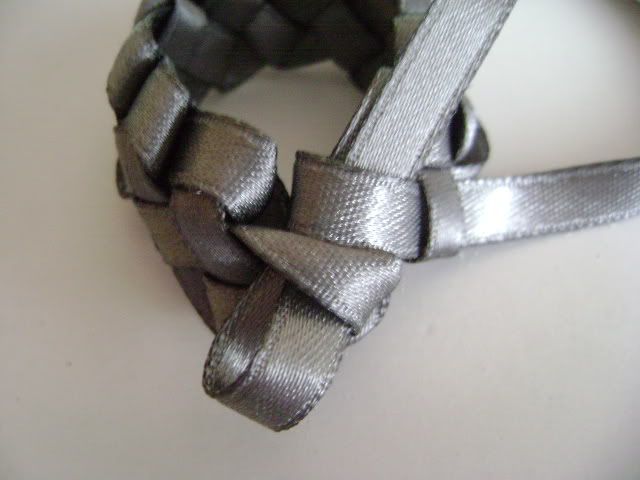
 8. Kada završite pletenje, spojite krajeve (ako želite vjenčić), tako da zadnje uho provučete čačkalicom kroz prvo uho koje ste napravili. Možete vezati u čvor, ili zalijepiti kapljicom cijanofixa (kao što sam ja) jer bolje drži i ravnije je.
 9. Kada je vjenčić gotov, ukrasite ga po želji:
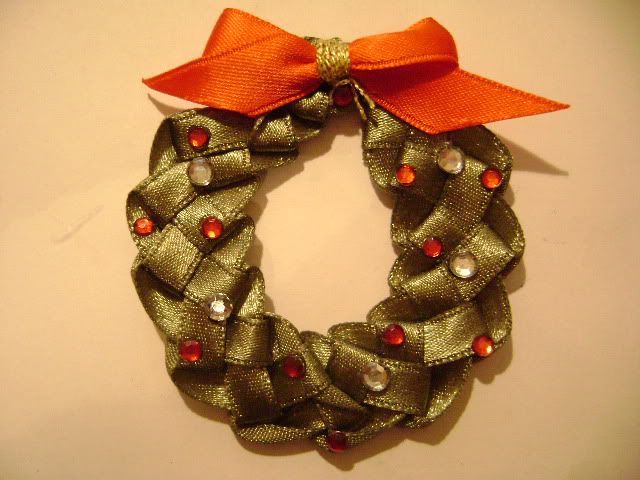 Puno uspjeha!
|
|
 |
|
| Sponzorirani linkovi | |
|
|
|
monna-1
Trajnica
Pridružen: 18 Travanj 2008 Lokacija: Croatia Status: Offline Bodovi: 2598 |
Opcije poruke
Hvala(0)
Citiranje Odgovor
Objavljeno: 18 Prosinac 2009 u 14:57 |
|
Pismo Djeda Božičnjaka
Želite svom klincu uljepšati blagdane? Napravite mu pismo djeda Božičnjaka!!!Samo slijedite upute tutoriala na linku!!! Vjerujem da veselju neće biti kraja!
preuzeto sa: aaasouth. com
|
|
|
|
|
vanja
Neukroćena biljka

Pridružen: 19 Svibanj 2008 Lokacija: Croatia Status: Offline Bodovi: 4968 |
Opcije poruke
Hvala(0)
Citiranje Odgovor
Objavljeno: 28 Prosinac 2009 u 20:31 |
|
Genijalko svaka čast

|
|
|
|
|
more
Odrastao grm 

Pridružen: 20 Ožujak 2009 Status: Offline Bodovi: 1118 |
Opcije poruke
Hvala(0)
Citiranje Odgovor
Objavljeno: 18 Siječanj 2010 u 16:39 |
|
Držač za papire
Scrap Paper Holder - Tutorial I made similar scrap paper holder few days ago. I just love it because it's nice and practical and you can put it anywhere you want. When I do cards or scrapbooking, there are always some pieces of paper left... with this holder I can have them all in one place instead of having them all over my working table. Since I promised a friend who visited me the other day that I will put a quick tutorial on my blog, here it is. You can make it in different sizes - my basic cardboard sizes are: 14 x 10 cm for the back, 14 x 3 cm for the bottom and 14 x 7 cm for the front. Cut the cardboard pieces and glue them to the back of the desired pattern paper - make sure you leave some space between them. Trim the paper about 2 cm around and trim the corners. Fold the edges and glue them down.   Cut the piece of coordinating paper that is a few millimeters smaller than the "core" you have in front of you and glue it down so you cover the edges. With you scoring tool, gently rub in the space you left between cardboard and try to put it into the final shape.   Now cut the paper for the side parts. I wanted the upper part of the holder to be wider than the bottom, so I first cut 6.5 cm long strip of pattern paper, cut it in half and marked 3 cm for the bottom (as that is the size of my bottom cardboard part as well), and 5 cm for the top. You want to get an isosceles trapezoid. On the sides with equeal lenght (in my case the 6.5 cm side) leave 1 cm for fold which you will glue down. (See the pics bellow, I can't tell that better). I distressed the back side of the trapezoids before I glued them as they were just too white for my quite dark background paper.     And that's about it. Of course you can embelish it as you want.   And finally, put some scrap papers in it. I'm going to make a bigger one and fix it on the wall to keep the bills that need to be payed in it. You can use it for other things as well, it's up to you.  Now I dare you to make your own and show it to me! :) |
|
|
|
|
more
Odrastao grm
Pridružen: 20 Ožujak 2009 Status: Offline Bodovi: 1118 |
Opcije poruke
Hvala(0)
Citiranje Odgovor
Objavljeno: 18 Siječanj 2010 u 16:41 |
|
Here are some great ways to create wall storage folders out of old books bound for the dump! This is a 90% recycle/reuse project! Other than rescuing the books from the Goodwill bins and buying a small package of buttons, everything else used to construct these wall storage folders came from project leftovers. While I was at the bins, I saw lots of discarded children's books. If I had school age children, I would be making these for their rooms to store school art projects, homework and other treasures using large format children's books in good condition.
Diane inspired me earlier this year with a post announcing a library class in which she was teaching purse making using old book covers. I immediately realized the idea could be adapted to create wall storage for all those millions of recipes and craft ideas all of you wonderful cooks and crafters have been sharing on your blogs. Now when I print them for later use, I just pop them into my beautiful wall folders! Not a permanent storage - just until I can get around to organizing them. After Christmas maybe! These are EASY and QUICK to make. I've included several simple construction options within the mini tutorials , so feel free to scan through and mix it up a bit. You could literally make one very quickly by cutting the pages out of a book that's in good shape, use the string and button method to create hinge straps, attach a bulldog clip to the top and - DONE! Before we begin - one cautionary tale! DO NOT DO AS I DID and use original Mod Podge when applying fabric to the book covers. Use the Mod Podge designed to be used with fabric. Amy of Mod Podge Rocks fame, has provided a very useful and thorough discussion of the many kinds of Mod Podge and their applications. Please take my advice - read and heed her words! LETS BEGIN BY REMOVING THE PAGES FROM THE BOOKS
I was amazed at just how easily pages can be removed from books! This particular book has pages that are glued into the spine section. Remove a few at a time using an exacto knife. (Pages are being saved for other projects!) Since this book is in excellent condition, I am not even going to finish the inside. Just remove the pages neatly and - Done!
Removing pages from a bound book is even easier! Simply cut the liner paper along the edge close to the binding.
Same with the back. The entire set of pages comes out in oner piece.
If you wish to give the inside a more finished look, simply cut pretty paper to size and glue in place with original Mod Podge.
The book I chose for storing recipes just happened to BE a recipe book! Believe it or not - I did not plan it this way! But when I saw some of the beautiful illustrations I had cut out - well - I just had to use one for the cover. Since I adore Biscotti with a cup of coffee, this image was a perfect choice! The green and white borders were actually part of another page. Glue paper to the cover using Mod Podge. Brush on two over coats of Mod Podge for protection, letting dry between coats and over-spray with an acrylic spray to seal.
Another option to make your recipe storage folder more "practical" - attach several often used recipes and hints to the cover where they can be seen easily when you need to refer to them.
Use an ice pick to "drill" holes for a simple hanging system and simple hinge straps. (Not reccommended for a very hard cover.) For the hanger, make two holes in the back cover 1-1/2" in from each side and 1/2" down from the top edge. Pull a piece of ribbon through both holes, tie in a knot or double bow and hang. For the hinge straps, make the holes in both the front and back covers. Place them approximately 2 1/2" down from the top edges and 3/4" in from the side edges and proceed as shown below.
The inspiration for this simple hinge strap came from a package sent to me from Joan who writes a lovely blog Nini Makes. She sent me treats this past spring wrapped in stamped brown paper and tied with string and a button.
Thread a needle large enough to accommodate your string or embroidery floss, but small enough to go through the button. Place the needle through the button you have selected for the front, then through the hole you just made on the front cover. Pass the needle through the hole in the back cover and then through the button you have selected for the back.
Now take your needle back through the other hole of the back button, back through the back cover hole and then up through the front cover hole and the front button.
Leave about 2 1/2 to 3" of string between the front and back, as shown, and tie a knot in the front button. Cut the string leaving enough of a "tail" to tie a bow. Ignore that black ribbon for now! We will talk about that in a bit. Repeat on the other side.
Finished! |
|
|
|
|
more
Odrastao grm
Pridružen: 20 Ožujak 2009 Status: Offline Bodovi: 1118 |
Opcije poruke
Hvala(0)
Citiranje Odgovor
Objavljeno: 18 Siječanj 2010 u 16:43 |
|
WALL FOLDERS FOR THE CRAFT ROOM
I can see a whole group of these wall storage files in a craft room - each cover design reflecting a different "favorite" craft! Rachel would embroider one, Hope would put a trilobite on one, Teri would paint one, Ann would quill one, Susan would bead one and Kathy would no doubt decorate with Safe Sparkle! I decided to make one using chile pepper fabric accented with a"chile pepper" Kanzashi and another using a mini"quilt".
Place your open book cover on your fabric and cut around it leaving about 3 " of fabric extending beyond the edges, as shown
Brush Mod Podge over the entire outside surface of the cover. You DO NOT need to use as heavy a coat as I have here. Way too much. AND BE SURE TO USE FABRIC MOD PODGE HERE. Original Mod Podge, especially in this concentration will leave unattractive shiny spots all over the surface. Definitely a candidate for Heather's CraftFail blog!
Be sure your fabric is lying with the wrong side facing you. Carefully place the cover, Mod Podge side down, on top of the fabric, centering as best you can. Press the cover material into place. Brush a little Mod Padge along the side and top and bottom edges of the inside cover.
Fold the fabric over the Mod Podge and press.
If you like, you can miter the corners as you fold them, adding a bit more Mod Podge to hold them in place. You can easily see here that I got way too carried away with my own application.
Once the folder cover has completely dried, you can line the inside with paper. Cut your paper so that it is the right size to cover the fabric edges on the inside of the cover by about 1". Brush the entire wrong side surface of the paper with original Mod Podge, apply to the cover, press for a good contact and let dry. Now, to create a hinge system using 3/8" wide ribbon instead of string and buttons.
However, I am using the images showing the application on the paper because they are easier to see than on black fabric. Determine the length of your ribbon by laying it on the partially open cover as shown. You will need about 3" more in length than the distance between the partially open front and back covers. See photo.
Crease the ribbon about 1 1/2" from each end
Measure 2 1/2" to 3" down from the top edges of both the front and back covers and make a pencil mark on the inside of the cover about 1/2" in from each side. Place a bead of glue on the inside front cover starting at the pencil mark and extending 1 1/2" toward the top. I used Beacon Fabric-Tac Permanent Adhesive. Place one of the 1-1/2" folded ends of the ribbon on the glue bead, cut end toward the top of the cover and the fold right on the pencil mark. Repeat with the other ribbon, glueing it to the other side of the front cover. Let dry thoroughly. Once dry, repeat with the back cover and the other ends of the ribbons.
Makes a perfect little hinge!
I made this little pepper red Kanzashi to resemble a Ristra to decorate the cover. BE SURE to follow this link. Gorgeous photo! Gorgeous! Then I decided to wrap the cover in some lovely pepper red gross grain ribbon to add interest and create a hanging system. Again, I used the original Mod Podge in copious amounts - big mistake. Ruined the look of the ribbon completely. If I had used Fabric Mod Podge, it would have been lovely.
Again, measure your fabric by cutting 3" beyond all edges of the open book cover as shown.
Now cut a piece of scrap quilt filler exactly the size of the open cover. Cut a piece of backing material - I used an odd piece of muslin - also the same size as the open book cover.
Now place the printed fabricwrong side up on the work surface. Center the quilt filler material on top and then the muslin liner on top of the filler.
CAREFULLY turn the sandwich over and using large safety pins, pin the three layers together.
Use a sewing machine to quilt all three layers together. I purposely selected this favorite piece of Laurel Burch Christmas fabric because it already looks quilted! And I wanted it out where I could see it every day! When you are done "quilting", remove the safety pins.
Look familiar! Brush Mod Podge over the entire outside surface of the book cover. Then apply the fabric and the liner paper just as described in the chile pepper wall folder above.
Once the you have completed the cover, apply the ribbon hinge system as shown above for the chile pepper folder.
To make hanging REALLY EASY, simply clip a 1 1/2" - 2" bulldog clip to the top of the back cover and hang. Make a bunch of wall storage folders! You can use them anywhere paper accumulates. I have three in use and they are already nearly full! I hope you will have fun making, designing and using them. I would love to hear what ideas you come up with for your own wall storage folders! |
|
|
|
|
monna-1
Trajnica
Pridružen: 18 Travanj 2008 Lokacija: Croatia Status: Offline Bodovi: 2598 |
Opcije poruke
Hvala(0)
Citiranje Odgovor
Objavljeno: 28 Siječanj 2010 u 19:43 |
|
"Proljetna mačka" - tutorial
Potrebno je:
- ostatak nekog platna, bilo koje boje
- škare, papir, indigo, olovka, konac
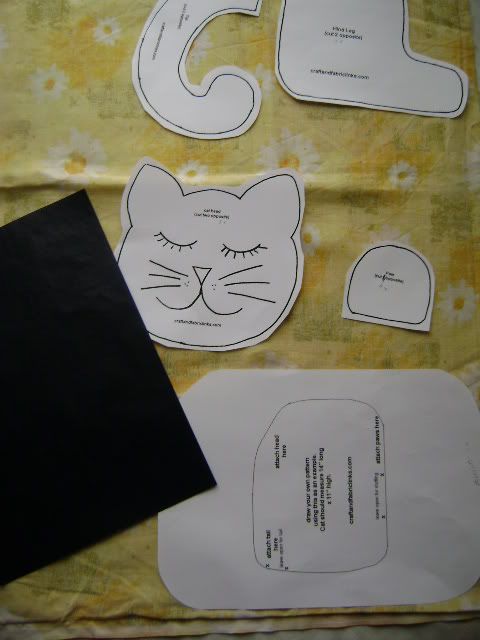 Iz papira izrežite oblik mačke (trbuh 2x,rep 2 x, glava 2x, rep 2x, noga 2x, šape 4x), položite na indigo list pa na platno koje je presavijeno na duplo, da ne režete jedan po jedan dio tijela.
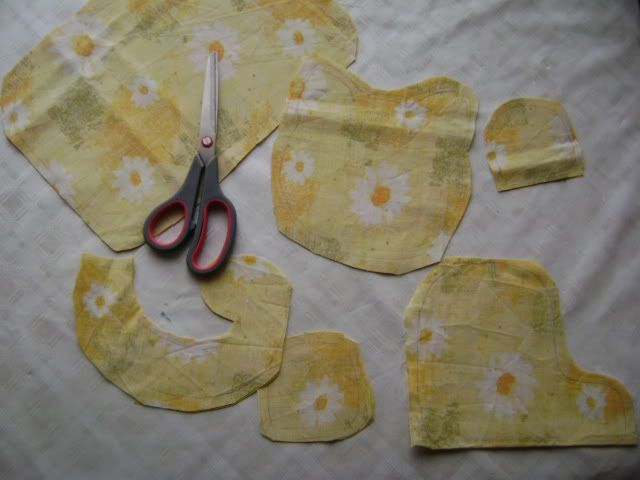 Kada ste sve izrezali, opšijte dijelove i ne zaboravite ostavitirupicu za punjenje.
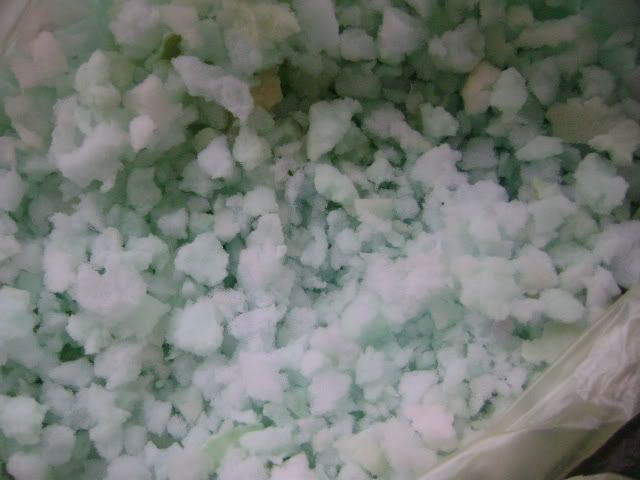
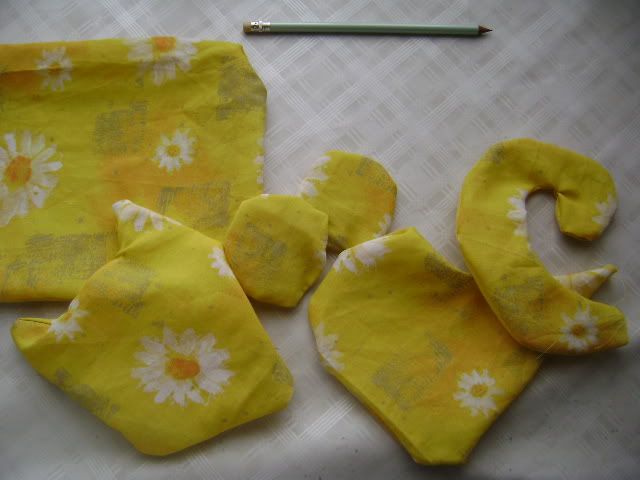 Poslije opšivanja, okrenite dijelove na pravu stranu i punite (ja sam koristila sitnu spužvicu koju sam sačuvala od starog jastuka, ali možete koristiti i filc, staru vunu, stiropor u zrnu ili sl.).
 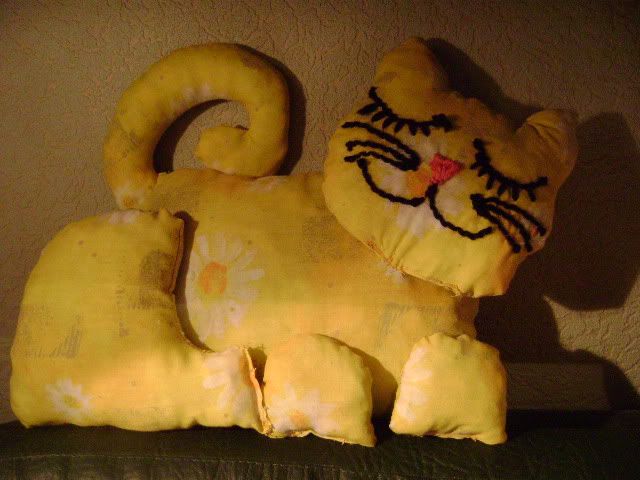 Kada ste sve napinili, zašijte proreze i pričvrstite dijelove na tijelo mačke. Na kraju izvezite iglom i koncem brčiće, nosić i okice :)
Ja sam izvezla pospanu mačku :) i gotovoooo - imate mali jastučak kad vam se prispava na kauču, ukras ili igračku za vaše dijete!!!
|
|
|
|
|
kami
Odrastao grm
Pridružen: 23 Rujan 2009 Status: Offline Bodovi: 1033 |
Opcije poruke
Hvala(0)
Citiranje Odgovor
Objavljeno: 26 Veljača 2010 u 14:20 |
|
Osjećam se kao outsider u ovom podforumu...
Pojam 'diaper cake' nikad nisam čula dok nisam naletjela na slike torti od pelena i oduševila se... Tokom izrada prve takve torte, fotkala sam faze izrade (sve sam radila na deki pa je sve bilo na njoj)... Na internetu imate svakojakih tutorijala, postoje i youtube snimke izrade, a ja sam škicnula 2-3 foto-tutorijala i princip prilagodila sebi... Recept za tortu od pelena: Sastojci: > puno volje, nešto vremena i prstohvati truda > paket pelena (veličine 1 (želite da se torta iskoristi dok je beba lakša od 5kg) ili 2 (želite da torta dulje stoji nekorištena) > podloga za tortu (kod mene: limeni pladanj) > središnji nosač torte (kod mene: kartonski tuljac, a može i veća bočica,losion ili ulje za njegu,itd.) > maramice,tanke gumice za kosu,široke kuhinjske gumice > ukrasni papir, satenske trake, rižin papir, dekorativne salvete itd. > dekoracije (kod mene: origami cvjetovi i leptiri te dudice za bebu) > dodatno: pokloni za bebu (robica, knjiga uspomena, čestitka, itd.) 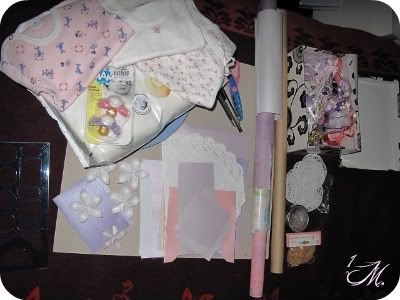 S obzirom da se zalažem da uporabni pokloni ne skupljaju prašinu i zauzimaju mjesto unedogled, odabrala sam najmanje pelene i svaku pelenu zarolala, umotala u 1/2 papirnate maramice i omotala gumicom tako da se pelene ne bi zaprljale okolnim elementima (kod mene: ponoviti 78 puta) 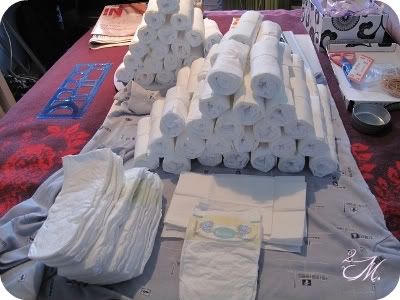 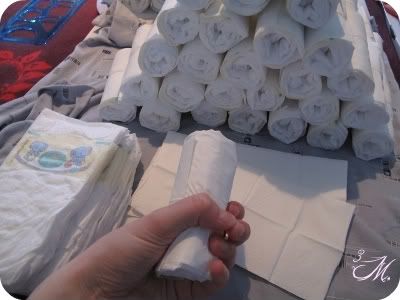 Torta može biti na proizvoljno mnogo katova, giant pack pelena (preko 100-120 komada) bi vjerojatno zahtijevao veću podlogu i više katova... Prizemlje se slaže od sredine oko tuljca prema van do ruba podloge i potom sve omotate najširom gumicom (kod mene: traka za gumi-gumi)... 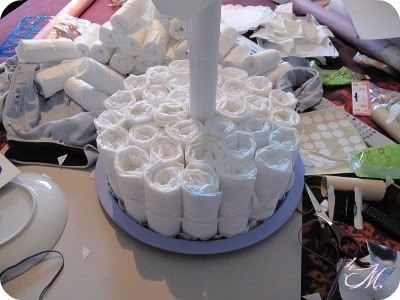 Meni je 78 pelena čak bilo previše pa su mi se prizemlje i 1.kat skoro podudarali... 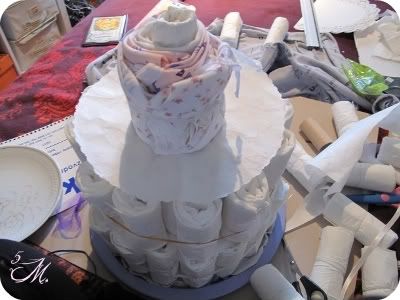 Svaki kat možete za zaštitu i zbog estetskog dojma prekriti krugom ili nečim sličnim... 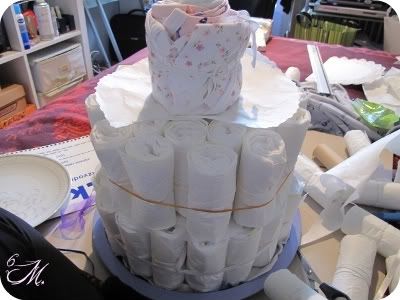 Odabrala sam 3 bodi benkice koje sam htjela da roditelji odmah izvade iz torte pa sam ih omotala na najgornji kat, okružila pelenama i na vrh stavila 3 posebno zamotane roladice pelena... (njih sam kasnije ugurala umjesto robice tako da se gornji kat ne bi raspao) 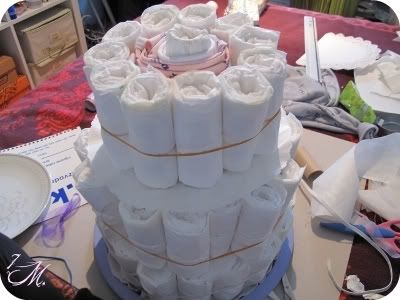 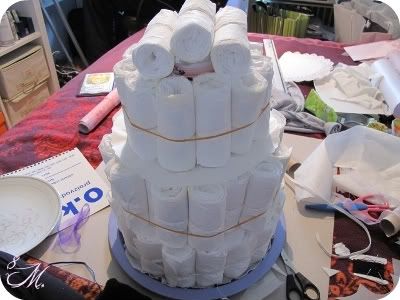 Kad je gola torta bila složena, omotala sam svaki kat trakama od papira, zavezala satenske trake i na njih svezala cvjetiće i mašne (nisam ništa htjela lijepiti tako da se torta lakše razmota i ukrasi sačuvaju kao proljetna dekoracija, usto nisam niti perlice niti išta sitno koristila da ne bi završilo negdje na podu kad beba počne puzati) 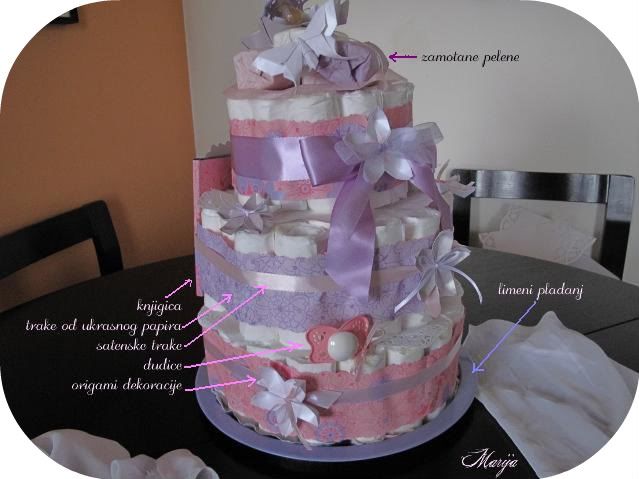 Od onih sam koji rijetko kad rade sve po receptu i često sastojke važem od oka pa i ovdje sve korake i sastojke možete prilagoditi po svome...  Ovakav poklon je stvarno nepresušan izvor ideja što se tiče dekoracija tako da mašti na volju...  (ovaj put sam datum rođenja uz težinu i visinu bebe napisala na leptirova krila, a drugi put tko zna gdje će ti podaci završiti) Više slika torte ovdje (klik!) |
|
|
|
|
monna-1
Trajnica
Pridružen: 18 Travanj 2008 Lokacija: Croatia Status: Offline Bodovi: 2598 |
Opcije poruke
Hvala(0)
Citiranje Odgovor
Objavljeno: 06 Ožujak 2010 u 11:43 |
|
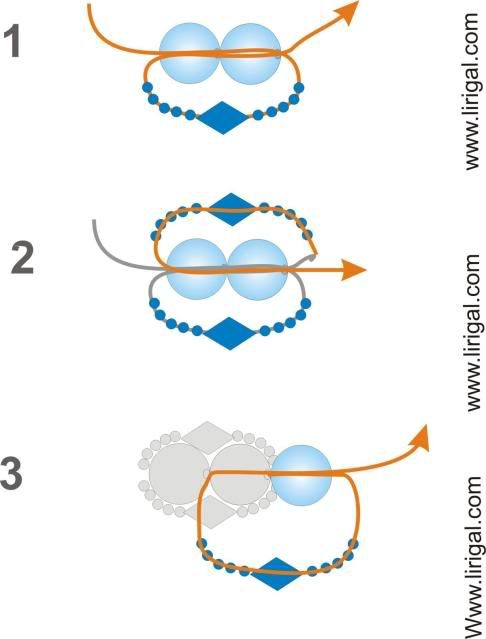
Svi koji žele pokušati praviti narukvicu (Sunshine), evo i slikovni tutorial:
Preuzeto sa - "Liri's Gallery of Beaded Jewelry "
možete experimentirati sa perlicama raznih veličina
  ....tko želi podijeliti kakav tutorial sa ostalima, neka ga stavi na stranicu
|
|
|
|
|
Lilly71
Novo sjeme 

Pridružen: 24 Studeni 2009 Status: Offline Bodovi: 50 |
Opcije poruke
Hvala(0)
Citiranje Odgovor
Objavljeno: 07 Ožujak 2010 u 22:19 |
|
...ja ću malo u stripu, jer imam samo sličice (inače "posuđeno" sa nekih ruskih stranica prije par godina)...
 ... ...                        |
|
|
|
|
UltraDwlux
Pustio korijenje 

Pridružen: 01 Svibanj 2010 Status: Offline Bodovi: 396 |
Opcije poruke
Hvala(0)
Citiranje Odgovor
Objavljeno: 13 Svibanj 2010 u 08:15 |
|
Sviđa mi se
 probam jednom izsavijati :) probam jednom izsavijati :)ps: hvala na ideji! |
|
|
|
|
KIKA '56
Mladi grm

Pridružen: 01 Ožujak 2010 Status: Offline Bodovi: 843 |
Opcije poruke
Hvala(0)
Citiranje Odgovor
Objavljeno: 22 Kolovoz 2010 u 13:20 |
|
-super ideje
|
|
|
|
|
arim
Odrastao grm

Pridružen: 16 Ožujak 2009 Lokacija: Vinkovci Status: Offline Bodovi: 1377 |
Opcije poruke
Hvala(0)
Citiranje Odgovor
Objavljeno: 15 Rujan 2010 u 15:47 |
|
Hvala ti na ovim idejam,jednom probam.
|
|
|
|
|
lilie
Trajnica
Pridružen: 10 Ožujak 2010 Lokacija: Belišće Status: Offline Bodovi: 2319 |
Opcije poruke
Hvala(0)
Citiranje Odgovor
Objavljeno: 18 Rujan 2010 u 23:18 |

|
|
|
znati mnogo ne znači biti mudar
|
|
|
|
|
sunceeee
Profil člana
Pošaljite privatnu poruku
Pronađi poruke člana
Poseti WEB site člana
Dodaj na listu prijatelja
Odrastao grm

Pridružen: 22 Kolovoz 2010 Lokacija: Hrv. zagorje Status: Offline Bodovi: 1634 |
Opcije poruke
Hvala(0)
Citiranje Odgovor
Objavljeno: 23 Rujan 2010 u 22:37 |
|
Ideja sa savijanjem lišća mi se jako sviđa, idući tjedan ću probati, možda to iskoristim za Božić!!!!
|
|
|
Nemoj da te život inpresionira, inpresioniraj ti njega! Život je san - učini ga stvarnim! (Majka Tereza)
|
|
|
|
|
Nena3110
Nedavno posijan
Pridružen: 18 Svibanj 2011 Status: Offline Bodovi: 98 |
Opcije poruke
Hvala(0)
Citiranje Odgovor
Objavljeno: 01 Srpanj 2011 u 23:29 |
|
Ja sam pravila još pre dve godine, još sam našla neko crveno lišće
 Žao mi je što ovde nema više tutorijala, pa ću pokušati da dam svoj skromni doprinos. Stalak za olovke i pribor   Potrebno vam je tri (može i više) kartonske rolne od toalet papira ili papirnih ubrusa, ja koristim neki, od koga su rolne baš čvrste, ne daju se saviti. Ukrasni papir Lepak Malo kartona za dno Trakice, perlice i slično za dekoraciju po želji.    Uh, tako mi je žao, započela sam i pretražih sve arhive, nema slika, imala sam u nekoliko faza. Međutim, vi ste kreativke, dovoljno vam je i ovoliko Dakle, isečete papir u obliku pravougaonika, onoliko komada koliko je rolni, ali da bude malo veći od rolne, pa ga nalepite oko rolne, i višak savijte unutra, uz lepljenje, malo se mora pogužvati. Onda isecite tri malo manja pravougaonika, da ih zalepite unutra, u rolnu, to je teško iz jednog komada, ja sam lepila iz dva komada, unutra se nastavak ne vidi, ali se pokrije prirodna boja kartona. na kraju, e, tu sliku sam našla, zalepite valjke jačim, univerzalnim lepkom jedan za drugi, i ocrtate dno od kartona, mada se i prethodno mogu ocrtati i seći pojedinačni krugovi, to dno takođe oblepite papirom, i za njega univerzalnim lepkom nalepite rolne. Ukrasite po želji, i stalak je gotov. Ovaj oranž sam namerno isekla da bude malo neobičan. Nadam se da vam se dopalo. |
|
|
http://nena3110.blogspot.com
|
|
|
|
|
Čarapice
Upravo klijam 
Pridružen: 20 Travanj 2010 Status: Offline Bodovi: 135 |
Opcije poruke
Hvala(0)
Citiranje Odgovor
Objavljeno: 20 Rujan 2011 u 14:44 |
|
Pokušavam vam postaviti neke tutorijale ali mi baš i neide.Porobam poslje kad mi muž dojde.
|
|
|
|
|
Kiki-ko?
Cvjetni guru 

Pridružen: 10 Veljača 2010 Status: Offline Bodovi: 6667 |
Opcije poruke
Hvala(0)
Citiranje Odgovor
Objavljeno: 23 Kolovoz 2012 u 21:02 |
|
Izgleda da muž nije došo.
|
|
|
Da imam rep mahala bi s njim
|
|
|
|
|
Odgovori
|
|
 Tweet
Tweet
|
| Pređi na drugi forum | Forumska ovlaštenja Vi ne možete objavljivati nove teme na ovom forumu Vi ne možete odgovarati na teme Vi ne možete brisati vaše poruke Vi ne možete urediti svoje poruke Vi ne možete dodati anketu Vi ne možete glasati u anketi |


 Opcije teme


